Showing posts with label Entree. Show all posts

Tuesday, February 12, 2013

Thai Green Curry (Gaeng Kiaw Wan)

The Lowdown:

I'm not sure that I've ever gone out for Thai food and not ordered a variation of this dish. It always manages to catch my attention, despite my best efforts to explore the remainder of the menu. In the end, what does it matter? Get a doggy bag and take it all home for later. However, this post isn't an meant to be an ode to my favourite Thai restaurants in town. Nor is it meant to praise one of my favourite "poor me, poor me, I'm sick and need a cure" recipes (although seriously, all that garlic, ginger, and shallots is a wonderful preventative medicine). No, this post is intended for something far more devious -- playful revenge.

I feel that over this holiday season, a bit of public payback is in order. Being the perfect son that I am, I decided that my parents would probably love a break from cooking while I was in their neck of the [urban] woods. Given that I love cooking, and they were paying for the groceries, it seemed perfect. Oh god how much I miss them paying for groceries.

Winters in Toronto can be quite brisk, making a spicy Thai green curry the perfect dish to make. After braving the cold, then fighting tooth and nail in the grocery store (December 23 in a grocery store is near suicide) I came home to the question, "why didn't you just buy the packaged green curry paste?" Oh, the humility! If this wasn't enough, it was soon followed by, "if it's not good, you still have time to go to the store and buy the packaged stuff." Oh lord, please help me restrain myself. And now everyone knows the antics I must deal with.


The Playlist:

Curry Paste:
4 Serrano peppers, chopped
1 large piece Ginger, chopped
2 Shallots, chopped
3 cloves Garlic, chopped
1 bunch Cilantro, stems only
1 Lime, zest and juice
1 Lemongrass stalk, outer layer removed then chopped
1 tbsp Oyster sauce
1 tbsp Fish sauce
1 tsp Coriander, ground
1 tsp Cumin, ground
1 tsp Salt
1 tsp White pepper, ground

Ingredients:
1 lb Mussels, fresh
1/2 lb Prawns
2 cups Shitake mushrooms, coursely chopped (optional)
Vegetables, julienne (optional)
3 cups Sui choy, chopped
3 tbsp Vegetable oil
1 can Coconut milk
2 cups Chicken broth (optional)
5 Kaffir lime leaves
Thai basil leaves, to taste
Thai chili peppers, to taste
Coriander, to taste

The Skinny:

  
After trial and error, along with a helpful tip, I found that an immersion blender is the easiest way with the best results. Apparently it releases the fragrance and oils of each of the curry paste ingredients. Optimally, a stone mortar and pestle works best, but it takes much longer and I don't own one.


  1. In immersion blender measuring cup (tall and thin): add lemongrass, ginger, and serrano peppers. Using immersion blender mince until a grainy paste forms. Then add shallots, garlic, and lime peels and repeat the blending process. Finally add the remaining curry paste ingredients and repeat the blending process.
  2. The curry paste makes a dish for 5-7 people. Or it can be separated into two dishes for 2-3 people. The remainder of the instructions are for the smaller portion. For the larger portion you can double the ingredients or add them as you please. The paste can be refrigerated for two weeks or frozen.
  3. In large wok: heat oil on medium-high heat. When oil is hot, add curry paste and cook until fragrant (about 5 minutes). This requires constant stirring so that the paste doesn't burn. Add 1/4 of the coconut milk and continue mixing until it becomes the same consistency as a thin guacamole. Reduce heat to medium-low, add the remaining coconut milk and bring back to a gentle boil. Add chicken broth and simmer for 30 - 45 minutes. 
  4. Remove 2 cups of liquid and set aside.
  5. To wok: If bell peppers and celery are desired add them now and cook for 5 minutes. Add Thai basil, Thai chili peppers, mushrooms, and kaffir lime leaves and remove from heat.
  6. Remove curry from the wok and place in a serving dish and set aside.
  7. In wok: on high heat add the liquid that was set aside and bring to a boil. Add mussels and prawns and cover. Cook until mussel shells open (about 2-3 minutes). Remove all mussels that remained shut. 
  8. Add mussels, broth, and prawns to the serving dish.
  9. Serve with rice and the chopped sui choy. Pouring the broth over the sui choy in individual bowls cooks it just enough so that it remains firm.


Stay Rad -h
Featured on: Premeditated Leftovers, 33 Shades of Green, Chef in Training, Food Renegade, Foodie Friday,  


Thursday, November 01, 2012

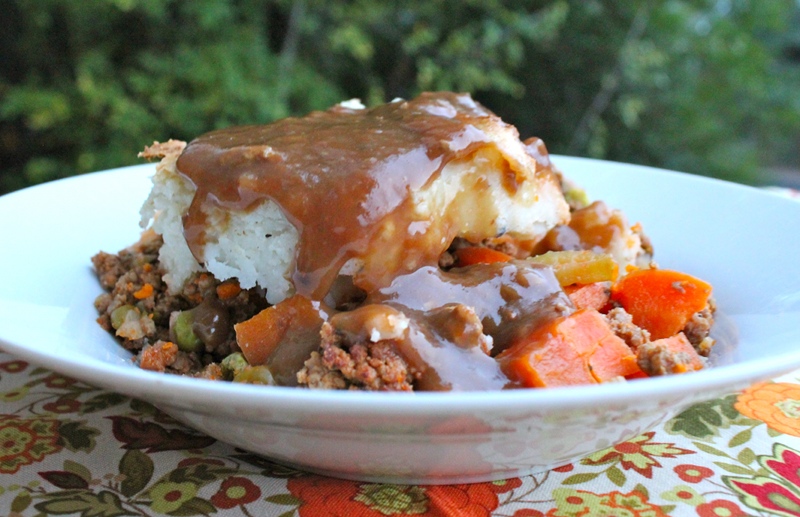
Rippin' Another Blog: Shepherd's Pie (Not Cottage Pie)

I don't talk too much about my romantic relationship on my blogs.


But John is instrumental in helping me get my posts done. He is endlessly supportive in his words, unquestioningly generous in his efforts to help me get the shots I need and constantly puts up with being served cold food because of said photo needs. He also eats everything. Good or bad. And he's honest too.

Honest about shepherd's pie.

I know right? In this moment you're like, wtf?

I grew up eating shepherd's pie. Or so I thought I did. Fast-forward 15 years or so and I learn that what I thought I was eating all those years was a farce. Or at the very least, a cultural hiccup.

Cottage pie V. shepherd's pie. 

Cottage pie is what we typically call shepherd's pie in North America. Ground beef, carrots, peas, onions, potatoes, baked in the oven and (hopefully) smothered in gravy. Uh, yes. Yum. Yes? Yes. 


But what this very clever and sexy beer-drinking physics-loving film-geek Brit told me was shepherd's pie must entail lamb. Hence the shepherd. Baaaahhh! (sheep noise). With beef it's simply cottage pie. And with the dish being of the English variety, he should know.

Rug. Ripped. Out. From. Under. Me.

Luckily he was there to catch me and I've been calling a spade a spade ever since - cottage pie = cows, shepherd's pie = sheep. Unless of course I want to give him a hard time... and then I conflate the two. Because I'm a bitch like that.

Speaking of bitches .... this recipe comes courtesy of a little blog titled The Domestic Man. It's okay to segue bitches because men can't be bitches. Can they? I followed his recipe to a T - actually, I followed it right into my stomach because it was Ah-mazing! Thank you Domestic Man for making my mouth happy and my blog a space to speak out about a very important issue. Baaaahhhh!

Shepherd's Pie (Not Cottage Pie)
(printable recipe) - serves 6.


Ingredients:

1.5 Lbs Ground Lamb.
3 Medium Russet Potatoes, peeled and chopped.
1 Small White Onion, diced.
1 Medium Carrot, diced.
1 Celery Root, diced.
2 Cloves Garlic, minced.
1 Tbsp Tomato Paste.
1/2 C Chicken Broth.
 2 Tsp Worcestershire sauce.
1/2 Tsp each fresh thyme and rosemary, stemmed and chopped.
1/2 C Frozen Peas.
3 Tbsp Butter .
1/2 C Heavy Cream.
Coarse Salt & Fresh Cracked Black Pepper.

What to Do:

Fill a large saucepan with the potatoes and cold water. Bring to a boil over high heat and cook until potatoes are fork tender - approx 20 minutes.

Drain and return the potatoes to the empty pot. Add 2 Tbsp of butter, the cream (starting with 1/4 C and adding more if necessary), and a good helping of salt and pepper. Mash until smooth but be careful not to over mash or you'll end up with a sticky gooey mess. Cover and set aside.

As the potatoes boil, heat a large pan over medium heat. When hot, add the lamb and brown, stirring often. When it is almost entirely cooked drain the meat, reserving the fat. Set the meat aside and add a couple of Tbsp of fat back into the pan, along with the rest of the butter. Melt and add the onion, carrots and celery. Cook until softened (approx 8 minutes).

Add the tomato paste and garlic and massage into the mixture. Saute a further 2 minutes.

Dump in the herbs, broth, Worcestershire and salt and pepper to taste. Stir and simmer until the liquid thickens slightly - approx. 3 minutes.

At this point you can turn your oven on to 450 degrees F.

Remove from the heat and reintroduce the lamb to the mixture as well as the peas.

Dump the lot into an 8" baking dish or roasting pan and spread even.

Gently top with the mashed potatoes - little bits at a time until it's even all over. Bake in the oven on the middle rack for 30-45 minutes or until the top of the potatoes gets crispy and slightly golden.

Pull from the oven, let rest 5 minutes, and then dish up! Feel free to serve with your favorite gravy recipe if you like gravy. Who doesn't like gravy?

Eat.
How do the people in your world make your life better?
Can men be bitches?
Photobucket

Tuesday, July 31, 2012

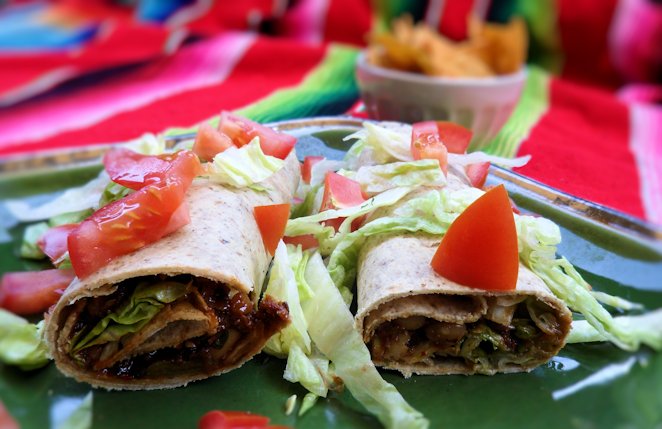
Nopale Bison Tacos

The Lowdown:

Okay, let's just say this was an experiement to try to cook, write, and photograph a blog session in an hour an a half. That's not what I intended initially - not even by a long shot. Regardless, here I am trying to get myself out of a jam again. I don't even like jam. Marmalade and jelly can get added to that list as well. Okay, any fruit related toast spread is not in my good books. Jam; however, is at the top of this list because I'm stuck in one right now (what a stupid saying anyway, which further makes me dislike jam at the moment). Like any good get-out-of-a-jam artist, I have a few go-to options. Actually, to be fair, everyone has the same one. TACOS. They are loved by adults, children, and anyone who is a hybrid mixture of the two (like myself). In fact, they are so easy to create that I'm making them as we... speak?


I guess I should consider myself lucky that while in this time management mishap I was fortunate enough to have everything on hand. Nopales on hand... WTF? To be fair, the only reason I have cactus paddles (nopales) on hand is because there is a grocery store in town that is open 24 hours a day. Splendid! I can now shop at 1:30am. No more children, whom were clearly raised by neglegent parents, running around with their miniature shopping carts acting like they are in a destruction derby and not a grocery market. I know that was me 25 years ago... Okay, maybe even 20 years ago, but still! I digressed. The point is, I can calmly hunt and gather now. No distractions. No kids. Nobody rushing to get last minute items for dinner. No kids. No kids. Did I say no kids? Yes, this whole paragraph was, in fact, to reiterate why I had napoles on hand at a time like this.

I should also be thanking Girlichef for her idea. I would thank her for the recipe, but to be honest, there was just too much writing. No time to read. Cook, eat, go. If you were reading two posts ago, you'll remember that showering isn't the best idea when you are cooking. However, considering my time restraints, I will be performing this daunting task again. Not to mention, trying to look decent, having a beer, and getting dressed. Err, I'm not sure if it will be in that order.

Now, for my busy night... at music bingo? Seriously, I'm in this much of a rush to get to music bingo? Well, maybe it's the $5 martinis. Maybe it's the corny 80's and 90's music. Maybe it's just getting out of the house on a monday. Either way, here's to a successful rush job on dinner. Tacos, you've once again saved me.


The Playlist:

3 Morita chilis
2 Pasilla chilis
1 Chipotle chili
1 Red onion, chopped
5 cloves Garlic
2 Tomatoes
1 tsp Cumin, ground
2 cups Water
Salt & Pepper, to taste

2 lbs Meat (I used bison), cubed
2 tbsp Olive oil
1/2 cup Navy beans, dried
1 Lime, peals only
1 tbsp Red wine vinegar
Water

3 Nopales (cactus paddles), de-thorned & cut into 1 inch squares
Water

Cilantro, to taste


The Skinny:

  1. Combined all the first layer of ingredients into a blender and blend until the mixture is smooth. Set aside and allow the flavours to mingle (sort of like speed dating I suppose).
  2. In large sauce pan: heat oil then add meat and brown on all sides. Add enough water to fully cover the meat, then add navy beans, lime peals, and red wine vinegar. Simmer on medium-low for an hour (or until beans soften and water is reduced to near-dry).
  3. In small pot: bring enough water to submerge nopales to a boil, then add nopales and boil for 2-3 minutes. Remove napoles from the water and set aside.
  4. In large sauce pan: add tomato mixture to the meat, cover, and simmer for 20-40 minutes. Add napoles and cilantro, then remove from heat.
  5. Serve with warm tortillas, or as tacos in this case.


Stay Rad -h

Featured on: Chef in Training, Premeditated Leftovers, 33 Shades of Green, Food Renegade, Lady Behind the Curtain, A Little Nosh,

Wednesday, July 11, 2012

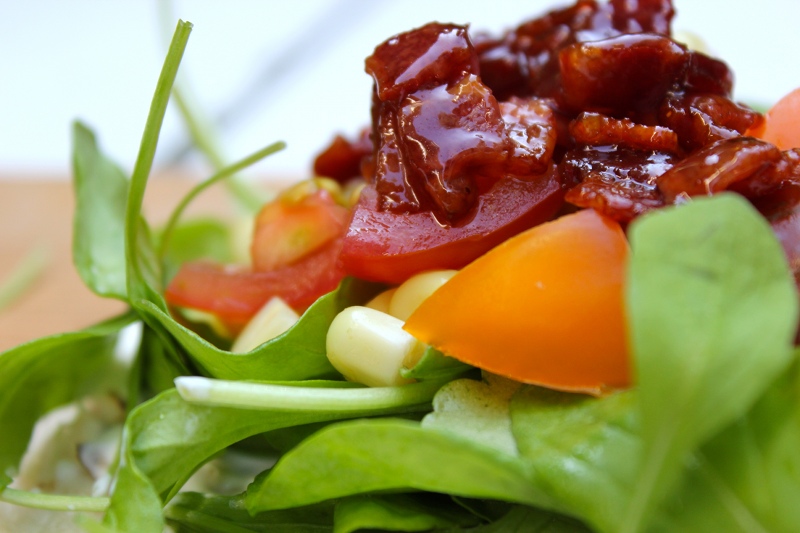
Cactus Jelly Bourbon'd Bacon Tacos

Good morning to you darlings!

So if you follow me @ Gastronomical Sovereignty, you may know I take part in this little thing called Foodie Pen Pals... And by little, I mean gargantuan. It's over 1000 members strong and each month we swap packages all around the world just stuffed with incredible food stuffs. It really is amazing to have so many food bloggers, non-food-blogger bloggers and blog readers connect over such vast distances!


This past month a woman named Tenecia had me as her assignee. You can read more about her here or check out her blog, Boobs, Barbells and Broccoli. One of the things she sent me was a locally crafted Cactus Apple Jelly. 

Um, first response: heck yeah! 

And my second response: what the ef is cactus apple jelly?


Now, the average person might spread that baby on some whole wheat toast, or a sesame seed bagel maybe, or if they were feeling really adventurous... dare i say, some homemade, from-scratch pancakes...? Oooooh, that's living on the edge!

But I'm no ordinary person. And neither is Tenecia. I wanted to do abnormality justice damn it!

Instead, I threw a good half jar into a small saucepan, reduced it down with a 'lil bourbon - because we all know bourbon makes everything better - and then used it as a glaze...for bacon.


Because if bourbon doesn't make everything better, bacon sure does. Mmmmm bacon... err bourbon... uhhh bourbony bacon.... mrraaaawwwwlllll.... (that's drooling in type form).

Tenecia also included a package of hand made tortillas from her area so what else could I possibly make besides cactus jelly bourbon'd bacon tacos?

Cactus Jelly Bourbon'd Bacon Tacos
(printable recipe) - serves 8 as an appetizer or 4 as a main.


Ingredients:
1 Lb. Happy Bacon, chopped.
8 Oz. Cactus Apple Jelly (though regular apple jelly would suffice).
1 Oz. Bourbon.
Handful or Two of Fresh Arugula.
1 Ear of Fresh Corn.
1 Pint Fresh Tomatoes.
Some Sour Cream (for serving).
8 Organic Corn or Flour Tortillas.

What to Do:

Place a pot of water over high heat and bring to a boil. Add the corn and allow to cook until tender. If it's fresh from the farmer's market it will cook much faster (approx 3 minutes); if it's store bought, hang on for 7-10. Drain, allow to cool to touch and then using a steak knife, saw the kernels off the cob. Set aside. 

As the corn cooks, dice the tomatoes and wash and dry the arugula. Sprinkle both lightly with salt and toss the arugula with a touch of good quality olive oil.

Place a large frying pan over medium-low heat. When hot, gently and carefully place the bacon in the pan. Cook until crispy, flipping half way through - be careful! The grease is a hot one! Drain on a paper towel lined plate and set aside. 

Turn your oven to 300 degrees F. Gently heat the taco shells as you finish the recipe. Alternatively, you could do this in a microwave for 60 seconds with the tortillas wrapped in a towel.

Wipe out the pan and add the jelly and bourbon, Reduce until relatively thick and sticky. As it cools it will get thicker. If it gets too thick, just reheat.

Add the bacon and stir well.

Throw all the ingredients into separate bowls and build your tacos...then...fill up your glass with one of these...and....

Eat!

What gets your creative motor running? What inspires you?


This post is linked up with Cast Party Wednesday; Whole Foods Wednesday @ This Chick Cooks; Whole Food Wednesdays @ Beyond the Peel; Frugal Days, Sustainable Ways; Showcase Your Talent Thursday; Full Plate Thursday; Tastetastic Thursday; Foodie Friday; Fight Back Friday; Fresh Bites Friday.

Wednesday, June 27, 2012

Incredible Crusted Steak Sandwich

Good morning to you my little chick peas!

Well, apparently it's meat-a-licious week at Taste Buds this week. I don't think Haydn and I could have made 2 meatier posts if we tried! 

That being said, a little meat never hurt anyone. Wait a second, that's not true. 

Take two: A little small scale, grass fed, organic, eaten in moderation meat never hurt anyone. There, that's better. 


Speaking of happy food, I have a bit of an announcement to make today! And if you've just come from Gastronomical Sovereignty, I apologize for the regurgitation - but how many different ways can you say the same news?


Sam @ Cooking My Way Through My CSA and I have been secretly corresponding with each other to bring you something new, fun and important next week! It's kind of a big deal - like us. Like you!

This is very cryptic, isn't it?

Oh hell, I'll just say it: Starting next Wednesday we will be co-hosting a weekly linky party/blog hop that encourages fresh food production, consumption, activism and awareness for bloggers and blog readers alike! We want to feature you and any and all of your CSA collections, farmer's market treasures, home grown/raised hauls, and/or any seasonal recipes or DIY projects or tutorials related to the above. Ultimately, we want to create a space and a resource for seasonal, organic, pastured, small scale happy food and the people that love it. Fun, right?? The blog hop will go live on Sam's blog and Gastronomical Sovereignty Wednesday at midnight, Eastern standard time with more instructions then. Hold onto your butts! It's gonna be a time!

And now to steal the segue I posted yesterday at GS - because why stop with the news? - how about a time for your mouth? A real good time!

....yeah, saying the same joke twice doesn't quite work, does it? I'll refrain from plagiarizing myself from now on. I promise.

Incredible Crusted Steak Sandwich
(printable recipe) - serves 2.


Ingredients:

2 5oz 1-1/2" Steaks, patted dry. (i.e. Sirloin, Strip-loin, or even Beef Tenderloin).
3 Oz Blue Cheese, crumbled.
1 Lemon for Zest.
2 Sundried Tomatoes, finely chopped.
2 Tbsp Pine Nuts.
2 Portobello Mushrooms, diced.
1 Shallot, diced.
1 Clove Garlic, finely chopped.
1 Large Sprig of Fresh Thyme.
1 C Heavy Red Wine.
Virgin Olive Oil.
Coarse Sea Salt & Fresh Cracked Black Pepper.
2 Decent Size Slices of Focaccia (approx big enough to fit your steak), with one side of crust cut off.

What to Do:

Remove the steaks from the fridge up to 45 minutes - but no less than 30 - before cooking them. This allows them to come to room temperature and therefore cook more evenly.

Once they're good to go, heat a frying pan (preferably cast-iron) over medium-high heat. As it heats up slather them with some oil (olive oil or a basic veggie one will do just fine) and then generously season the steaks on both sides with a good dose of salt and pepper. 

In a mortar & pestle, mash together the pine nuts, blue cheese, sundried tomatoes, and lemon zest. Set aside.

Place steaks in the very hot pan. Do not move them around at this point. Let them sear! They will "release" from the pan when the outside is good and brown. 

Cook 4-5 minutes, flip. Top with the blue cheese crust and continue to cook for a further 3-4 minutes*. 

Turn your broiler to high. 

Remove steaks from heat, place to rest on a wire rack (to allow air circulation and juice flow) and cover with tin foil.

As the steak rests, place focaccia under the broiler with the cut side up. Watch carefully! Toast until golden and remove from the heat. Set aside.

Sauce: Reduce the heat to medium and chuck the shallots and garlic into the pan with all the brown bits left over from the steak, along with a small glug of olive oil. Stir well and allow to soften for about a minute. Add the mushrooms. Get some nice brown color on those babies. Once they look just about done, carefully add the wine and thyme to the mixture. Bring to a simmer and reduce by about half. Season with salt and pepper to taste.

To serve: Place the bread on the plate, top with the rested steak and a couple spoonfuls of the sauce. Pair with a helping of Grilled Balsamicy Summer Asparagus, Smurshed Potato Things, or really class it up with a handful of Garlicky Oven Fries.

* This cooking time will result in a medium-rare steak. If you want your meat cooked less or more, here is a simple guide to doing so.

Eat.

Can you think of anything you can link up for the Blog Hop?


Photobucket

This post is linked up with Whole Foods Wednesday; Cast Party Wednesday; Frugal Days, Sustainable Ways; Showcase Your Talent Thursday; Full Plate Thursday; Tastetastic Thursday; Fight Back Friday; Fresh Bites Friday.

Tuesday, June 26, 2012

Bag-Free Brisket (Scratch Made)


The Lowdown:


If corned beef reminds you of some log shaped piece of meat in a bag, you're not alone. With fond memories, I pass by it every time I'm hunting and foraging in the grocery store. I don't remember the last time I had corned beef, but I do recall loving it. That fall apart texture. The aroma. The grip-you-by-the-balls flavour. All things that I appreciate in a meal.

But how many of you have actually made one yourselves? I sure know I haven't. Part of the problem -- that damn curing salt (Prague powder #2 or pink curing salt). I live in Victoria, BC which is by no means a small town. However, finding that salt proved to be a killer. I searched for weeks, going to specialty butchers, delis, grocery stores, markets, and meat shops. Nothing. Then I got the brilliant idea to search online. In the true spirit of difficulty, I couldn't find a place that would ship to Canada. Then, I did. But they had issues dealing with my visa. For the love of everything holy, why can't I buy this damn salt! It's like it's the international salt of mystery. Double-0 Salt, with the dastardly plan of preventing people from making cured meats.


Obviously, since I'm writing this post, you know I've somehow got my grubbly little mitts on some. Let me take you back... way back. So two days ago I was complaining (and by this I mean ranting out of control) about this predicament with a friend, the GM of Smoken Bones, when his chef, who I've become friends with, over heard me. With a simple gesture of his hand, he vanished with a puff of smoke and reappeared moments later with the secret ingredient. No, not eye of newt, a porcupine quill, or old man's beard. It was the Double-0 Salt that has eluded me all these tiresome weeks. Okay, he's not a magician per se, so he didn't really vanish with a puff of smoke. However, he did get me the salt and he is a mastermind when it comes to smoking meats, cheeses, and just about anything else. Warning! Warning! Shameless plug alert! If you're ever in this part of the world check out Smoken Bones.

Back to the mission at hand. I now had the salt of curing in my possession. Fast forward 12 days. The brine has done its magic. The brisket is either ready to be smoked (to make Montreal smoked meat) or boiled to make a traditional brisket dinner. Decisions decisions.


The Lowdown:

3 lbs Beef brisket
1/4 cup Sea salt
2 tbsp Pink curing salt (Prague Powder #2)
Water

2 tbsp Coriander*
5 whole Chili peppers, dried*
2 tbsp Peppercorns, whole*
6 Bay leaves, dried*
2 tsp Cumin, whole*
1 Cinnamon stick, crushed*
1 tsp Clove, whole*
1 Cardamom pod, whole*
1 tbsp Mustard seed*
1 tsp Allspice, whole*

*These ingredients can be skipped if you are choosing to use store bought pickling spice.

The Lowdown:

  1. Place the beef brisket into a sealable container that is large enough to house the brisket, then add pickling spice ingredients, salt, curing salt, and enough water to entirely cover the brisket, and then some (I used approximately 4 cups).
  2. Place in a refrigerator for 7-12 days to allow the pickling spices to ramp up the brisket's flavour.
  3. Remove the brisket from the brine, and allow to soak in regular water for 20-30 minutes to get all the excess salt out of it.
  4. Dump out the soaking water and refill the pot so that 3/4 of the brisket is covered by water. Optional, add a cinnamon stick, a few cloves, some mustard seed, some peppercorns, and some all spice to the water (this will really make the brisket a knockout).
  5. Cover, bring water to a boil, then reduce heat and allow to simmer on low heat for 2-3 hours. Remove from water and serve warm.
  6. Enjoy.


Featured on: Chef in Training, 33 Shades of Green, Premeditated Leftovers, Spain in Iowa, Food Renegade, Lady Behind the Curtain,

Stay Rad - h

Tuesday, May 15, 2012

Strange Brew Diaries #1 - Driftwood Brewery

The Lowdown:


["This movie was shot in 3B - three beers - and it looks good, eh?" - Bob McKenzie.]

Remember being a kid in a candy store? All those choices. All those, seemingly, difficult decisions. Well, this same feeling can be recreated when you're 19+ in beautiful Victoria, British Columbia. I've heard a rumor on more than one occasion that we have more micro-breweries per capita than anywhere in the world. With a population of 344,000 for the greater Victoria region (a mere 80,000 for Victoria), we support five breweries, four brewpubs, and two cider houses. Needless to say, we love our local brew. I am no exception to this. 

Unlike a lot of cities that boast abnormally high amounts of beer-snobs, Victoria is fairly mellow. We know what we like and we have no desire to defend or push our opinions (at least while we are sober). That, and we don't have the urge to produce the hoppiest beer ever (that a lot of west coast American Breweries seem to do). Don't get me wrong, I love me a good IPA and the distinguished bite that it gives. But seriously, extremely hoppy does NOT always equal extremely good. I'm sick of going to beerfests and listening to people only talk about the hoppiest beer they've had. News flash, there are dozens of varieties of beers for a reason. So get off your high-horse, get rid of your pompous attitude, try thinking for yourself (aka not just following fads), and explore the amazing variety of craft beers that your local region has to offer.


[(To Pam in a beer tank that's being flooded with beer) " My brother and I used to say that drownin' in beer was like heaven, eh? Now he's not here, and I've got two soakers... this isn't heaven. This sucks" - Bob McKenzie.]

This, as the title kinda sorta states, is my first ode to one of my favourite local breweries and one of my favourite movies. This episode features three beers from the all-star line up that Driftwood Brewery offers. I personally love their desire to create west coast variations of traditional beers (excuse for for 5 minutes while I refresh my refreshments). Yup, that was good.


I've never cooked with beer before. I mean, how could you possibly have the will power to let a beer sit in the fridge all lonely, begging you to consume it, while it waits for the day that it can be used in some (hopefully) glorious experiment. Mmmmmmm beer. I mean, it's the only alcoholic beverage that is acceptable to drink for breakfast, lunch, or dinner. Seriously, I'm sure Captain Crunch even has a beer pairing (although,that shit will still cut the roof of your mouth). Anyway, this is the first three course beer-oriented meal plan that I have produced. I hope you enjoy all, or one of these recipes, and that they maybe inspire you to try this with your local breweries. I will definitely be doing this with the remaining 10 local breweries so check out the Strange Brew Diaries periodically.

[(Bob Mckenzie to his dog) "Eh... Hosehead, once you get there you can have all the free beer and sausages you want" - Bob McKenzie.]


The Playlist:


Driftwood Ale Onion Soup

4 Red onions, sliced thinly
4 cloves Garlic, minced
1/2 cup Butter
3 cups Driftwood Ale
4 cups Beef stock
3 tbsp Red wine
1 tbsp Grainy mustard
1 sprig Rosemary
Parsley, chopped for garnish


Driftwood Farmhand No-Knead Bread

4 cups Wholegrain flour
1/2 cup Wholegrain flour
1/2 cup Water (as hot as your tap goes)
12 oz Driftwood Farmhand Ale
2 1/2 tsp Yeast
1/2 tsp Sugar
1 tsp Salt
Cornmeal


Driftwood White Bark & Lemongrass Muscles on Pappardelle Noodles 

2 lbs Salt Spring Island muscles
1 lb Manila Clams
2 cups Driftwood White Bark Belgian-Style Wit
3 Shallots, diced
3 cloves Garlic, minced
1 stalk Lemongrass, inner core only minced
1 tbsp Parsley, minced
2-4 tbsp Butter
1 tbsp Olive oil
1 tsp Red mustard seed, freshly ground
1 tsp Orange zest
1/2 tsp Chili flakes (optional)
1 box Pappardelle noodles
Salt & Pepper, to taste
Cornstarch & Water, to thicken sauce if desired.


Beat Caprise Insalata w/ Driftwood Ale Balsamic Reduction

3 Beats, boiled and pealed
250g Buffalo mozzarella*
3 Tomatoes, sliced in disks
10 - 15 Fresh basil leaves
10 - 15 slices, Spicy smoked meat**
1/2 cup Driftwood Ale
1/2 cup Balsamic vinegar
2 tsp Orange zest
1-2 tbsp Honey, depending on sweetness desired

*I prefer a sharp cheddar though.
** Capicollo works well, or any spicy salami.


The Skinny:


 Driftwood Ale Onion Soup
  1. Melt butter in a large sauce pan. Add the onions and garlic and saute for about 40 minutes.
  2. Add wine to deglaze pan for about 3 minutes.
  3. Add remaining ingredients, cover, and simmer for 40 minutes. Remove rosemary sprig and serve warm. You may also serve with crusty bread and Gruyere cheese to make it a more authentic French onion soup.

Driftwood Farmhand No-Knead Bread
  1. Mix water, yeast, sugar, and 1/2 cup flour into a large bowl. Cover with a dampened cloth and allow to sit for 30 minutes.
  2. Mix in Driftwood Farmhand ale. Once mixed in, add the remaining flour and salt and mix until a tacky ball forms. If it is too dry add more beer, and if it is too tacky (sticking to bowl and not forming a ball) add more flour. This is not a science.
  3. Cover with a warm damp cloth and allow to sit for 4 hours. If you want to speed up the process, place in an oven that is around 70*F for 2 hours. It works best if you turn on your oven and set it to 150* then turn it off for about 10 minutes (of course, every oven is different).
  4. Form dough into a ball by scraping the outside of the bowl with a non-stick rubber scraper and putting in towards the centre. Take this ball and place it on a well floured surface. Form it into the desired shape (I prefer the shape of a French loaf). Sprinkle flour on top.
  5. Put cornmeal on a heavy baking pan and place the loaf shaped dough onto the baking pan. Cover with a dry towel and allow to rise for another hour. Take a sharp knife and put a long slit down the centre of the loaf.
  6. Place an oven-safe dish half full of water on the lower oven rack and the baking pan (with the dough) on the middle oven rack. Bake at 425* for 35 minutes.
  7. Place bread on a cooling rack and allow to cool.

Driftwood White Bark & Lemongrass Muscles on Pappardelle Noodles
  1. Rinse and de-beard the muscles and clams under cold water. Discard any of the muscles or clams that do not close, as they are dead. Set aside.
  2. Cook the pasta as directed on the packaging. Set aside.
  3. In a large, shallow pot add the oil, shallots, garlic, salt & pepper, and lemon grass. Cook on medium heat until shallots start to become translucent (about 3 minutes). Add the Driftwood White Bark and bring to a rolling boil, then add the clams and muscles and cook until they open (about 5-10 minutes). After cooked, transfer the muscles and clams into a separate bowl.
  4. To the pot: add parsley, 2 tbsp of butter, chili flakes, orange zest, and mustard seed. Bring this to a boil and add more butter if desired (helps reduce the bitterness).
  5. Place the muscles and clams onto the noodles and drizzle sauce onto the pasta.
  6. Crusty bread can be used to soak up the remaining sauce.

Beat Caprise Insalata w/ Driftwood Ale Balsamic Reduction
  1.  Slice the beets, tomatoes, and cheese about 1/3 inch thick. Layer the salad so that equal amounts of each ingredient are present (IE: beat, tomato, salami, cheese, basil, etc.)
  2. In a large, shallow sauce pan combined the Driftwood Ale, honey, orange zest, and balsamic vinegar. On medium-high heat bring to a simmer and allow for the mixture to reduce to a syrupy texture (about half of the volume).
  3. Add 2 tbsp more Driftwood Ale to the reduction and mix well (this will make the beer's flavour more pronounced).
  4. Drizzle on the caprise insalata and enjoy.


Stay Rad - h